The other day, I noticed that my starter was taking longer to double in size - it used to take about 4 hours after feeding it. It then became 10 hours, so I knew somethng was wrong, so I took it out of the fridge, divided it (just in case something went badly with one part), and kept feeding each half every 12 hours. Well, this produced a lot of sourdough starter that needed to be discarded (about a cup total every 12 hours).
I got this recipe from the web
The Fresh Loaf
Sourdough English Muffins
Makes about 12
1/2 C starter (mine is a 100% hydration white starter)
1 C milk
2-3/4 C AP flour
1 TBSP sugar
3/4 tsp salt
1 tsp baking soda
Semolina or cornmeal, for dusting
Combine starter, 2 C of flour and milk in a large bowl. Stir to combine, cover with plastic wrap, and leave out for 8 hours or overnight.
After the overnight rest, add remaining flour (add a little at a time until the dough reaches the proper consistency), sugar, salt and baking soda and mix well.
Turn onto a lightly floured surface and knead for 4-5 minutes.
Roll out to 3/4" and cut with a biscuit cutter into rounds. You can reroll the scraps, but you may need to let the dough rest before cutting more muffins from them.
Place muffins on a piece of parchment dusted with semolina and let rest for 45 minutes.
Spray griddle or skillet lightly with spray oil. Heat to medium and cook muffins for about 6-8 minutes on each side, or until browned on the top and bottom and cooked through. These have great griddle spring and rise quite a bit during the "baking".
Split with a fork and enjoy with your favorite topping!
My Notes:
Personally, I could not seem to get the griddle on the stove top adjusted where it would not burn the tops of the muffins after only a couple of minutes, so I left them on the griddle just long enough to brown and flipped them over. After the other side had browned, and the entire batch was browned on the stove top, I tossed them onto a pizza stone in a 350 degree oven for 9 minutes - flipping them once during the baking. Came out just fine.
Saturday, March 26, 2011
Wednesday, March 23, 2011
Using Spring Forms Part 2
Using some tips from Peter Reinart's Artisan Bread Every Day, I made this loaf

The difference is this:
625g flour
452g water (100 degrees)
9g salt
5g yeast (notice that this is more than before .80%)
I mixed the dough using a Kitchen Aid, and then did four folds by hand in the mixing bowl, each 10 minutes apart, before placing the dough into a plastic container, and then into the refrigerator.
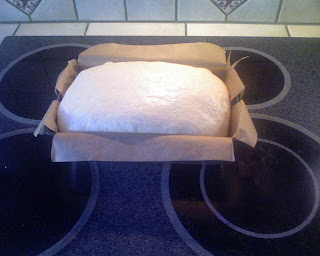
After about 12 hours in the refrigerator, I emptied the dough onto an oiled surface, and shaped the loaf into a boule, and placed the dough into a loaf pan (8-1/2" springform lined with parchment).
I preheated the oven to 550 degrees (F), and after adding water to the roasting pan, I lowered the temperature to 450 degrees, and placed the pan with the dough into the oven.
I baked the bread until the internal temperature reached 205 degrees.
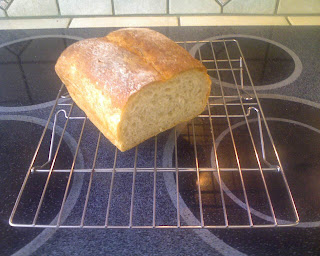
Notice the slight char at the "ear" of the loaf!
This was a spectacular loaf, with great crust and even crumb.
So, for the 9x5 loaf pan, this would be:
Flour...469g....100%
Water...339g....72.3%
Salt......7g.....1.49%
Yeast.....3.75g.....0.80%
Total weight 819g

The difference is this:
625g flour
452g water (100 degrees)
9g salt
5g yeast (notice that this is more than before .80%)
I mixed the dough using a Kitchen Aid, and then did four folds by hand in the mixing bowl, each 10 minutes apart, before placing the dough into a plastic container, and then into the refrigerator.
After about 12 hours in the refrigerator, I emptied the dough onto an oiled surface, and shaped the loaf into a boule, and placed the dough into a loaf pan (8-1/2" springform lined with parchment).
I preheated the oven to 550 degrees (F), and after adding water to the roasting pan, I lowered the temperature to 450 degrees, and placed the pan with the dough into the oven.
I baked the bread until the internal temperature reached 205 degrees.
Notice the slight char at the "ear" of the loaf!
This was a spectacular loaf, with great crust and even crumb.
So, for the 9x5 loaf pan, this would be:
Flour...469g....100%
Water...339g....72.3%
Salt......7g.....1.49%
Yeast.....3.75g.....0.80%
Total weight 819g
Friday, March 11, 2011
Using Loaf Pans
I wanted to try loaf pans just to see what would happen. Using the same recipe for Pane Pugliese, this was:
625g flour
452g water - 100 degrees (F)
9g salt
4g yeast
I used warm water because I wanted a quick ferment. I started at 12noon so that I could get the bread baked by the end of the day, and mixing the ingredients, and let rise for 6 hours at room temperature. I emptied the dough onto a flat surface, and cut the dough in half (by eye), and returned half to the plastic container, and placed it into the refrigerator for use another day.
I did an envelope fold, and shaped the dough into a boule, and placed the boule into a loaf pan that I lined with parchment, and placed some corn meal onto the parchment. I covered the dough with a piece of oiled plastic, and a towel. I let this dough proof for 1 hour, and removed the oiled plastic and towel, and let the dough proof for 1 hour more.
I preheated the oven, pizza stone (on the middle rack), and roasting pan (on the bottom rack) to 450 degrees (F) for about 20 minutes before baking. Just before baking, I lightly dusted the top of the dough with flour, poured a small line of olive oil along the middle of the length of the dough, and used a razor to slice the dough.
I added a cup of heated water to the roasting pan, and placed the loaf pan on the pizza stone for 10 minutes. After 10 minutes, I removed the roasting pan, and continued to bake. After 20 minutes total baking, I removed the parchment from the loaf pan, along with the dough, and slide the dough onto the pizza stone, and rotated it 180 degrees.
After 15 minutes more of baking (total 35 minutes), I inserted the probe from the electronic thermometer, and it quickly alarmed at 205 degrees (so I don't know what the true internal temperature was). I removed the loaf, and allowed it to cool.
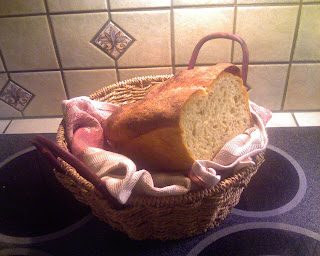
The loaf cooled fairly rapidly in about half an hour, and this is what it looked like:

The crust and crumb were excellent, with great flavor. This may quickly become my favorite because of the shorter fermenting, baking, and cooling times.
Some notes:
Peter Reinhart suggests that for a 4-1/2 by 8 inch loaf pan, the dough should weigh 25oz (709g), and for a 5 by 9 inch pan, use 32 to 38 ounces (794 to 907g).
My pan is about 5" x 9-1/4" at the top, and about 4" x 8" at the bottom, and about 2-1/2" deep. It does hold about 8 cups of water to the rim.
He suggests allowing the dough to dome about 1" above the pan.
I calculate that my dough is roughly 1090g total, half is 545g - so this is only about 75% of the smallest reccommended size. I will increase the size of the dough next time, and see if the results are equally as good or better. It looks like (from answer below) that using about 75% of the total dough - just for ease of eyeballing, would be in the correct range (about 817g).
So to reduce the recipe to the loaf pan size:
Flour...625g...100%
Water...452g....72.3%
Salt......9g.....1.44%
Yeast.....4g.....0.64%
Total weight is 1090g, but we only want 820g (rounding for ease), about 75% of the current recipe.
Flour...469g....100%
Water...339g....72.3%
Salt......7g.....1.49%
Yeast.....3g.....0.64%
Total weight 818g
Cooks Illustrated Forum
Cook's Illustrated says:
The "standard" bread pan for quick breads is 9" x5" and holds 8 cups, more or less.
For yeast breads, the standard pan is usually 8½" x 4½" and holds six cups, more or less. I have two of them. If you want only one size loaf pan in the house, this is the one. Many quick bread recipes that call for 9" x 5" pans will fit in 8½ x 4½" pans.
Another useful size, if you can find them is about 7"x 3" with a capacity of about 4 cups. With them, you can make two loaves from a quick bread recipe and three small loaves from a two loaf yeast bread recipe.
Mini pans are usually about 5" by 3" and hold 2 cups. They are sold in sets of four and the set will hold a single recipe designed for 9" x 5" pans.
End quote.
So the next trial was to use the sourdough recipe:
1 cup of starter (about 220-240g)
515g flour
342g water - 100 degrees (F)
9g salt
4g yeast
I followed the same directions as above, except the first rise took only about 3 hours (this was too much yeast because of the leavening power of the sourdough). I used 813g of dough (it was the closest I could get to 817g when cutting it), and the dough rose too much during the second rise.
One trick that I used here that I would repeat was to trace the bottom of my loaf pan onto the parchment, and then cut from the edge of the paper to the ends of the short side of the pan. Then I folded the paper into the pan (folding the long sides around the back of the short sides), and cut the paper down to the corners, and folded the paper down - just to keep it out of the way.
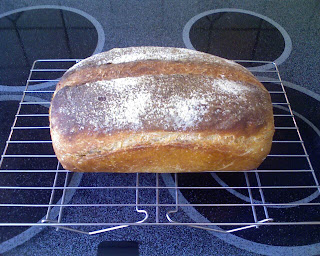
The bread came out very tasty with good crust and crumb. You can see that the crust separated from the crumb somewhat, and that was probably due to too much yeast.
To reduce the sourdough recipe,
The sourdough starter was originally about 20% of the total weight. That would calculate to:
Sourdough starter 164g (82g flour + 82g water, about 3/4 cup, more or less)
Flour...387g....100% (469g-82g)
Water...257g....72.3% (339g-82g)
Salt......7g.....1.49%
Yeast.....1.5g.....(reduced amount)
Total weight 817g
More sourdough could be used, but I like the flavor that it adds without becoming "sourdough" bread.
625g flour
452g water - 100 degrees (F)
9g salt
4g yeast
I used warm water because I wanted a quick ferment. I started at 12noon so that I could get the bread baked by the end of the day, and mixing the ingredients, and let rise for 6 hours at room temperature. I emptied the dough onto a flat surface, and cut the dough in half (by eye), and returned half to the plastic container, and placed it into the refrigerator for use another day.
I did an envelope fold, and shaped the dough into a boule, and placed the boule into a loaf pan that I lined with parchment, and placed some corn meal onto the parchment. I covered the dough with a piece of oiled plastic, and a towel. I let this dough proof for 1 hour, and removed the oiled plastic and towel, and let the dough proof for 1 hour more.
I preheated the oven, pizza stone (on the middle rack), and roasting pan (on the bottom rack) to 450 degrees (F) for about 20 minutes before baking. Just before baking, I lightly dusted the top of the dough with flour, poured a small line of olive oil along the middle of the length of the dough, and used a razor to slice the dough.
I added a cup of heated water to the roasting pan, and placed the loaf pan on the pizza stone for 10 minutes. After 10 minutes, I removed the roasting pan, and continued to bake. After 20 minutes total baking, I removed the parchment from the loaf pan, along with the dough, and slide the dough onto the pizza stone, and rotated it 180 degrees.
After 15 minutes more of baking (total 35 minutes), I inserted the probe from the electronic thermometer, and it quickly alarmed at 205 degrees (so I don't know what the true internal temperature was). I removed the loaf, and allowed it to cool.
The loaf cooled fairly rapidly in about half an hour, and this is what it looked like:

The crust and crumb were excellent, with great flavor. This may quickly become my favorite because of the shorter fermenting, baking, and cooling times.

Some notes:
Peter Reinhart suggests that for a 4-1/2 by 8 inch loaf pan, the dough should weigh 25oz (709g), and for a 5 by 9 inch pan, use 32 to 38 ounces (794 to 907g).
My pan is about 5" x 9-1/4" at the top, and about 4" x 8" at the bottom, and about 2-1/2" deep. It does hold about 8 cups of water to the rim.
He suggests allowing the dough to dome about 1" above the pan.
I calculate that my dough is roughly 1090g total, half is 545g - so this is only about 75% of the smallest reccommended size. I will increase the size of the dough next time, and see if the results are equally as good or better. It looks like (from answer below) that using about 75% of the total dough - just for ease of eyeballing, would be in the correct range (about 817g).
So to reduce the recipe to the loaf pan size:
Flour...625g...100%
Water...452g....72.3%
Salt......9g.....1.44%
Yeast.....4g.....0.64%
Total weight is 1090g, but we only want 820g (rounding for ease), about 75% of the current recipe.
Flour...469g....100%
Water...339g....72.3%
Salt......7g.....1.49%
Yeast.....3g.....0.64%
Total weight 818g
Cooks Illustrated Forum
Cook's Illustrated says:
The "standard" bread pan for quick breads is 9" x5" and holds 8 cups, more or less.
For yeast breads, the standard pan is usually 8½" x 4½" and holds six cups, more or less. I have two of them. If you want only one size loaf pan in the house, this is the one. Many quick bread recipes that call for 9" x 5" pans will fit in 8½ x 4½" pans.
Another useful size, if you can find them is about 7"x 3" with a capacity of about 4 cups. With them, you can make two loaves from a quick bread recipe and three small loaves from a two loaf yeast bread recipe.
Mini pans are usually about 5" by 3" and hold 2 cups. They are sold in sets of four and the set will hold a single recipe designed for 9" x 5" pans.
End quote.
So the next trial was to use the sourdough recipe:
1 cup of starter (about 220-240g)
515g flour
342g water - 100 degrees (F)
9g salt
4g yeast
I followed the same directions as above, except the first rise took only about 3 hours (this was too much yeast because of the leavening power of the sourdough). I used 813g of dough (it was the closest I could get to 817g when cutting it), and the dough rose too much during the second rise.

One trick that I used here that I would repeat was to trace the bottom of my loaf pan onto the parchment, and then cut from the edge of the paper to the ends of the short side of the pan. Then I folded the paper into the pan (folding the long sides around the back of the short sides), and cut the paper down to the corners, and folded the paper down - just to keep it out of the way.
The bread came out very tasty with good crust and crumb. You can see that the crust separated from the crumb somewhat, and that was probably due to too much yeast.

To reduce the sourdough recipe,
The sourdough starter was originally about 20% of the total weight. That would calculate to:
Sourdough starter 164g (82g flour + 82g water, about 3/4 cup, more or less)
Flour...387g....100% (469g-82g)
Water...257g....72.3% (339g-82g)
Salt......7g.....1.49%
Yeast.....1.5g.....(reduced amount)
Total weight 817g
More sourdough could be used, but I like the flavor that it adds without becoming "sourdough" bread.

Saturday, March 5, 2011
Using Springform Pans
One of the characteristics of Pane Pugliese is that it is a free form hearth bread. However, because the dough is so slack (wet), it creates a very flat loaf.
I personally like to use this bread for sandwiches (as well as everything else), so I want to create a loaf that has more height.

This is how I did it.
Using the formula and technique on this page:
No Refrigerator Pane Pugliese
After allowing the dough to ferment all night at room temperature, I lined a 8.5" springform pan with a piece of parchment that was about 13" square. This just happens to be the length of my particular parchment. I then sprinkled some cornmeal onto the parchment paper, and set this pan aside.
I emptied the dough onto a well floured flat surface, and did an envelope fold. I flipped the dough over, and formed a boule, and placed it into the middle of the springform pan. Hamelman or Envelope Fold
I covered the dough with a piece of plastic that I lightly oiled with olive oil, and let this sit, covered with a towel for about 2 hours. (It probably did not need to be that long, but I went for a bike ride, and set the oven to turn on about 30 minutes before I returned from my ride.) I placed a pizza stone on the oven middle rack, and a large roasting pan on the bottom rack.
When I returned, the oven was preheated to 450 degrees (F). I heated a cup of water in the microwave for 2 minutes, and in the meantime, I carefully removed the plastic from the dough, and lightly dusted the the top of the dough, and made a single razor cut down the center.
I poured half the water into the roasting pan, and closed the oven door quickly. When I was ready, I placed the springform pan onto the pizza stone, poured the rest of the water into the roasting pan, and closed the door. After 10 minutes, I removed the pan of water. After another 10 minutes of baking (20 minutes total), I opened the springform, and lifted the dough by pulling up on the parchment on two sides. I placed the parchment and dough back onto the pizza stone for about 5 minutes, and then removed the parchment after about 25 minutes total baking time.
I used a probe thermometer to monitor the internal temperature to 205 degrees (F), and removed the loaf.

12 Stages of Bread Making
Peter Reinhart video
Bread Essentials - The 12 Stages of Bread Production ~ the butcher, the baker
Alice Q. Foodie says it this way:
1.scaling (ingredients)
2.mixing (kneading)
3.fermentation (rising)
4.punching
5.scaling dough (dividing)
6.rounding
7.benching
8.makeup and panning
9.proofing
10.baking
11.cooling
12.storing (or eating, if you are like me)
Subscribe to:
Posts (Atom)